
Agentic Custom Forms
GARY doesn't have to live in a separate window. With Agentic Custom Forms, administrators can embed GARY directly into item records — pre-loaded with the right prompts for that list or workflow by your administrator. When a user opens an item, GARY is already there, already in context, already ready to help. No extra navigation. No setup. Just AI-powered support where the work actually happens.
Why This Matters
Custom forms replace raw field lists with structured, guided data entry — grouped inputs, required fields, conditional logic, and role-based access. Data captured through forms feeds directly into SmartLists, SmartBoards, and GARY's analysis pipeline.
Well-designed forms are how CORAS becomes an application, not just a database. You build interfaces at the speed of operations without custom engineering.
With Agentic Custom Forms, administrators can take it further — embedding GARY directly into item records so users get AI-powered assistance without leaving the form. No context switching. No setup on the user's end.
Example
A contracting officer opens a contract record to review a Statement of Work. Instead of switching to GARY, setting context, and asking a question, they see GARY already open in the record — pre-loaded with prompts like "Flag any clauses that conflict with FAR Part 12" and "Summarize the key deliverables in this SOW." One click. No context switching. The analysis is done before they would have finished navigating to it the old way.
That's what a well-configured Agentic Custom Form delivers. The administrator set it up once. Every contracting officer on the team gets that experience every time they open a contract record.
Who This Guide Is For
Administrators configuring Gary within custom forms
End users interacting with Gary inside item records
Part 1: Build a Custom Form
Where to Find Custom Forms
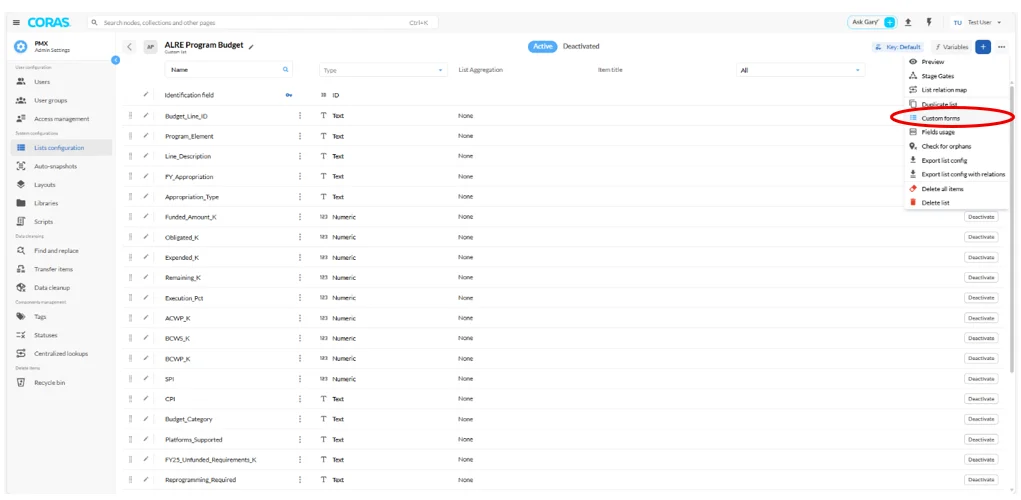
Custom Forms are found in every list configuration under the configuration menu — the three dots in the upper right corner of the list, next to the plus sign. Each list includes a default custom form containing all available fields.
Create a New Form
To create a new form, click + Add Custom Form. You can also clone an existing form to use as a starting point.
Form Types
When creating a form, choose the type that matches your workflow:
Standard Form — for regular data entry and editing.
Status Form — for capturing state changes in a workflow.
Transitional Form — for processes requiring approval or state transitions. Transitional forms help track how items move through defined stages. Setting up a transitional workflow requires one form per stage — each defining what information is collected and what actions are available at that step.
Configure the Form
The top left section of the form builder contains the core configuration options:
View/Edit Permissions — control whether users can view only, view and edit, or have restricted access based on their permissions.
Activation Toggle — enable or disable the form without deleting it. Active forms are available to users. Inactive forms are preserved but hidden.
Below the main controls, manage form access by assigning users or user groups and setting their permission levels.
Design the Form Layout
The form layout section lets you structure how fields appear to users:
Section Management — group related fields together
Field Placement — drag and drop fields to arrange them logically
Multi-column layouts — use available space efficiently
The right-hand panel shows all available fields divided into three categories: Custom Fields, System Editable, and System Read-only.
Required Fields — toggle Required on any field to make it mandatory. Required fields are marked with an asterisk. The form cannot be submitted if required fields are left empty.
Read-only Fields — enable Read-only to display information that cannot be edited. Useful for reference data, calculated values, or system information.
Field Visibility — only fields you explicitly add appear on the form. Removed fields return to the right-hand panel and remain available for future use. Nothing is deleted.
Part 2: Embed GARY in a Custom Form
Once your form is built, you can configure GARY to appear inside item records associated with that form — pre-loaded with the right agent and prompts for that workflow.
For Administrators: Configure GARY on a Custom Form
Step 1: Open AI Settings
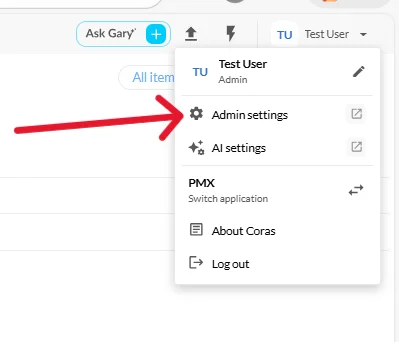
Go to Admin Settings.
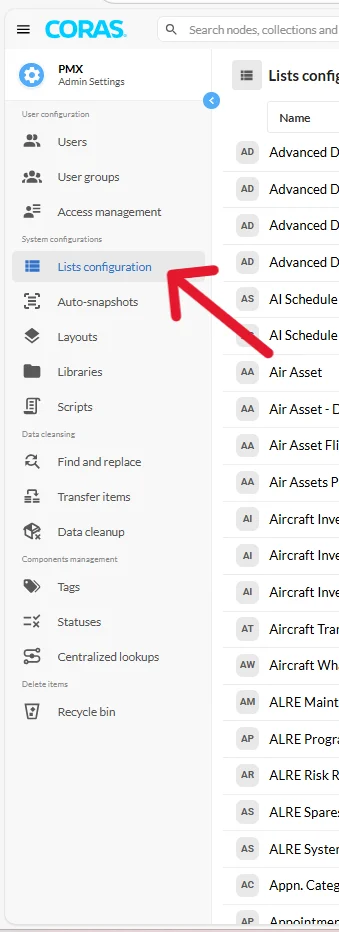
Select List Configuration from the menu.
Navigate to Custom Forms in your chosen List.
Locate the form you want to configure and click the AI Settings icon
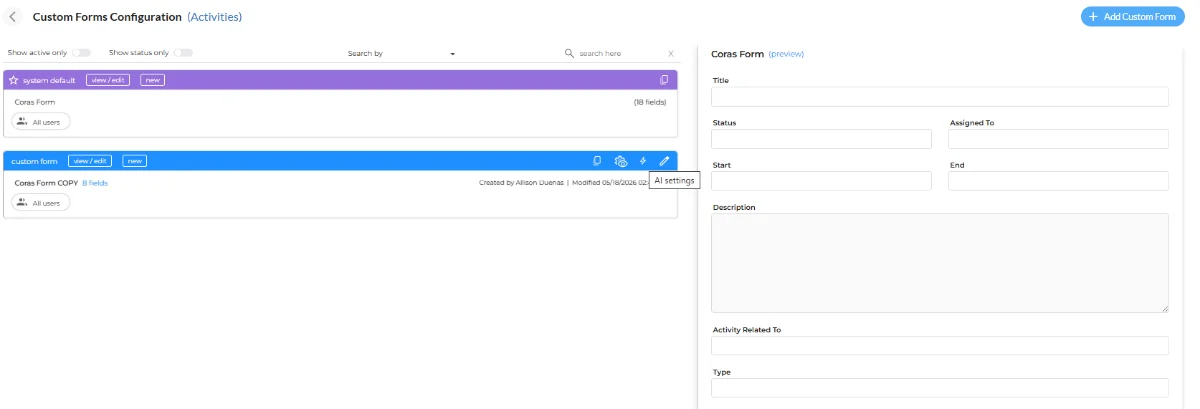
AI Settings can be configured independently for each form, giving you full control over the GARY experience across different lists and workflows.
Step 2: Configure GARY for the Form
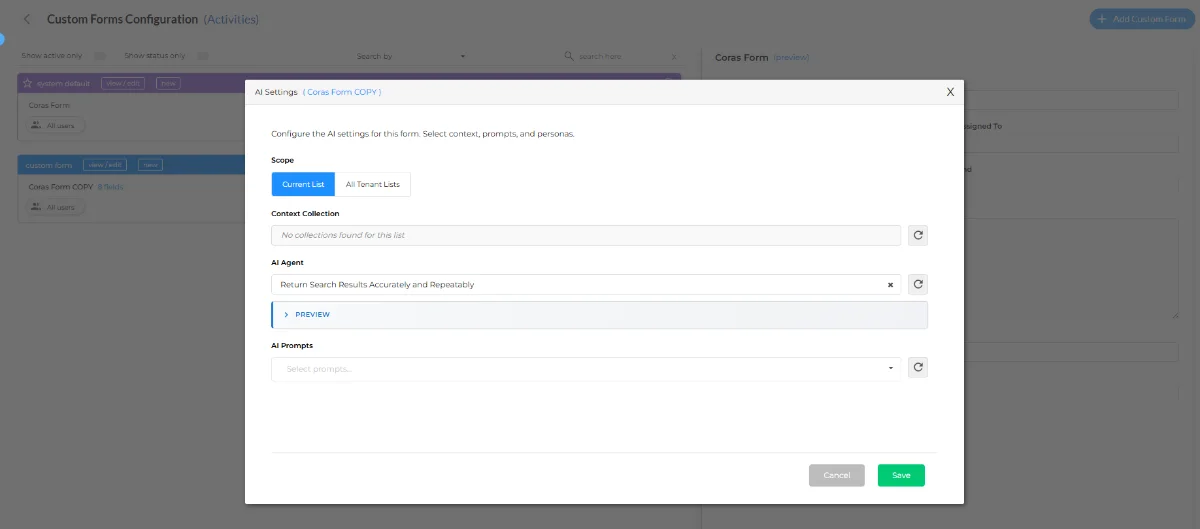
The AI Settings panel contains the following configuration options:
Scope
Choose whether to pull AI configurations from the Current List only or from All Tenant Lists. Use Current List when the configuration you need is tied to this list. Use All Tenant Lists when you want to apply a configuration from a different list — for example, applying an SDCP list config to this form. CORAS allows you to attach AI configurations from multiple lists, giving you flexibility when managing complex environments.
Context Collection
Select the data collection this form will work from. This determines the scope of data GARY has access to when responding within the item record.
AI Agent
Select which GARY agent you want to use for this form. Different agents may be set up for different purposes or lists, so make sure you select the one most relevant to the workflow this form supports.
AI Prompts
Select the prompts you want available to users when they open an item record. Only the prompts you choose here will be visible — this keeps the experience focused and relevant rather than overwhelming users with the full prompt library.
This is where the real power is. A contracting officer shouldn't have to scroll through hundreds of agents and thousands of prompts to find the three that apply to their work. You choose those three. They click one. That's the entire interaction.
Step 3: Save Your Configuration
Click Save. The configuration applies immediately. Users who open item records associated with this form will see GARY loaded and ready with the prompts you selected.
For End Users: Using GARY in an Item Record
If your administrator has configured this for your list, you don't need to do anything except open a record. GARY will be there. The prompts will be relevant to your work. Click one and get an answer. That's the entire experience.
Navigate to your list and click any item to open its record view
Locate the Ask GARY section within the record — GARY is already loaded
Select a prompt from the curated set your administrator has made available
Review GARY's response directly within the record view
GARY's responses are based on the data tied to the item you're viewing. Complete, up-to-date records produce the most useful responses.
What success looks like: When you open an item, you'll see an Ask GARY section already loaded with a curated set of prompts. If you don't see GARY in the record, the form may not be activated or the AI settings may not be saved. Contact your administrator or CSM — it's a quick fix on their end.
Tips
For Administrators
Keep your prompt selection focused — a smaller, well-chosen set creates a cleaner experience and keeps users on task
Use All Tenant Lists in the Scope field to reuse existing AI configurations rather than creating duplicates across multiple forms
For End Users
If the prompts available don't cover what you need, contact your Customer Success Manager — they can work with your admin to add relevant options
FAQ
Why are the prompts I see here different from what I see in GARY elsewhere? Your administrator has configured a specific set of prompts for this form — chosen because they're relevant to this list and this workflow. The full prompt library is still available in GARY's main interface. What you see here is curated for this context specifically.
Get Help
Contact your Customer Success Manager (CSM) or visit the Customer Resource Center for additional support with Agentic Custom Forms configuration.