
Central Ingestion
Central Ingestion is how you bring structured data into CORAS at scale. Upload a spreadsheet or CSV, map its columns to CORAS fields, and import records directly into your nodes and lists. This replaces manual data entry during data calls and program reviews.
GARY can assist during ingest — analyzing your uploaded dataset, identifying formatting issues, missing values, and duplicates, and flagging corrections before the data reaches your lists.
Why This Matters
Data calls shouldn't require your analysts to re-enter information that already exists in a spreadsheet. Central Ingestion moves structured data directly into CORAS — mapped, validated, and ready for GARY to analyze.
One file can distribute records across your entire node structure automatically. No manual sorting, no copy-paste across lists.
Every ingestion is logged with source file, destination nodes, configuration summary, and timestamps — fully traceable for compliance and audit purposes.
Which Ingestion Method?
Before you start, confirm your data type:
Structured data (Excel or CSV) — use Central Ingestion (this article)
PDFs and unstructured documents — use PDF Area Mapping & Recognition
The Data tab import — an alternative path for structured data. Note: if you create a list using the Data tab, you must use the Data tab for all future updates to that list. If you created your list through Central Ingestion, the Data tab cannot update it. Choose one path and stay consistent.
When to Use Central Ingestion
Uploading data from Excel or CSV files into CORAS nodes and lists
Creating or updating mission-critical lists from structured source data
Distributing data across one or multiple nodes from a single ingest file
Replacing manual data entry during data calls or program reviews
The Central Ingestion feature in CORAS enables authorized users to manually upload, configure, map, and process structured data into designated nodes and lists using the Manual Ingest method. This workflow is essential for teams who need to ingest spreadsheets or structured documents outside of automated or API-driven pipelines.
Before You Start
Three things to confirm before you upload:
File format — Excel or CSV with a clear header row
Multi-node ingests — add a Node column to your spreadsheet before uploading. Field values must exactly match CORAS node names or records will not ingest.
Status mismatches — only admin users can modify available status values in Administrator Settings. Resolve mismatches before ingesting if possible — it saves time at the mapping stage.
On list configuration: You can create a list configuration before you ingest (in Admin Settings → List Configuration) or at the time of ingest. For a fresh tenant just getting started, create it at ingest — it's simpler and avoids setting up dependencies before the data exists. Pre-creating list configuration is useful when you need a specific structure in place before data arrives, but it can complicate ingest if the fields don't match what's in the file.
Step 1: Access the Manual Ingestions Tab
Click the upright arrow icon at the top right of CORAS (to the left of the automation lightning bolt).
You will land on the Manual Ingestions tab.

Step 2: Upload the File
Click Ingest Items (top right)
Upload your file — click to select or drag and drop into the highlighted box
Click Continue
Step 3: File Configuration
Set your file options:
Sheet to Ingest — if your Excel file has multiple sheets, select the sheet to ingest. Each sheet must be ingested separately.
Select heading row — choose the row that contains your field names, typically row 1
Click Submit File in the bottom right
In the Ingestion details flyout, click OK to continue — or Cancel ingestion to start over
The file will be analyzed. You will receive an email when analysis is complete. Use the refresh arrows in the upper right to track status.
Step 4: Map the List
Once the Status shows Analyzed, select Actions → Map List.
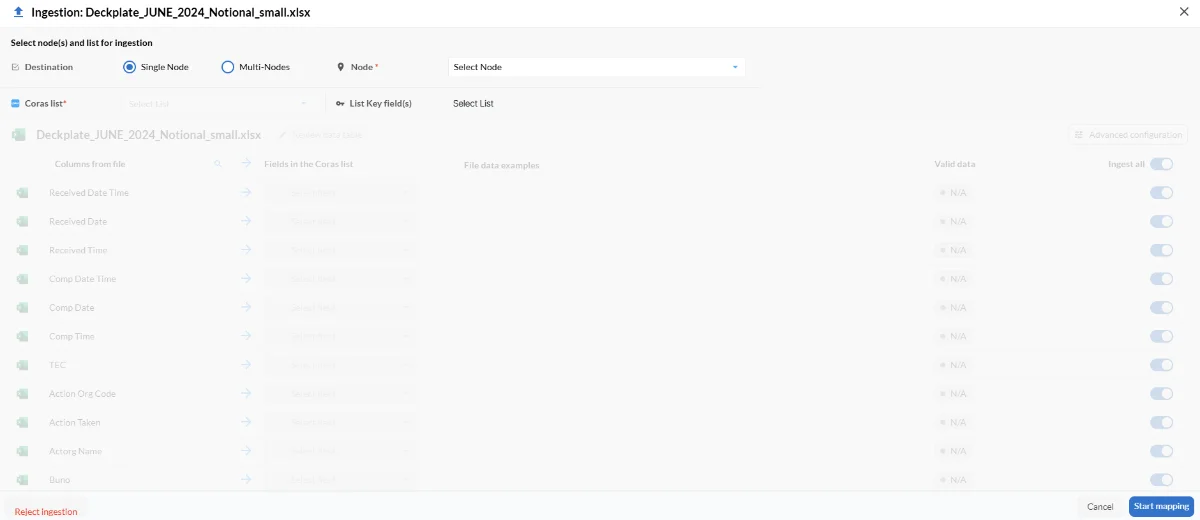
Single Node Ingestion
Select Single Node
Choose the target node from the dropdown
In the CORAS List dropdown, choose an existing list or create a new one by entering a list name
Multi-Node Ingestion
Select Multi-Nodes Ingestion
From the Map Nodes Column dropdown, choose the field in your file that defines which node each record belongs to
Field values must exactly match CORAS node names. Records without a valid match will not be ingested.

Step 5: List Key Configuration
The List Key makes each row uniquely identifiable. Choose the right type for your use case:
Autogenerated (Default) – CORAS creates a unique random GUID automatically. Use when records won't need to be updated later.
Custom – Select a single field as the key — use when the list will be updated in the future ingestions. Choose one field from the Key dropdown.
Compound – Up to five fields combined as the key. Use when no single field is unique on its own. Choose fields from the Select fields dropdown.
Then choose the uniqueness level:
Tenant — unique across the entire tenant
Node — unique within a specific node only
Name your Display name field and toggle visibility using the Visible in list checkbox.
Step 6: Map Fields
CORAS will auto-match fields from your file to your list fields. Before you verify the mappings, review the field types — this is where most ingest decisions happen.
Verify or adjust mappings as needed.
Confirm field types (e.g., date, number, text, lookup) and update via dropdown if incorrect.
Toggle off any fields you do not want to ingest.
During mapping, you can click Reject ingestion (bottom left) at any time if you decide to adjust the spreadsheet and restart the process.
Validation status for each field:
Good – Ready to ingest. Proceed.
Warning – Non-blocking issue (i.e. empty values or outliers). Hover over the warning icon for details.
Error – Must be resolved before ingesting (i.e. mismatched data types). Fix the field or deactivate it in the Ingest all column to skip it
You can click 'Reject Ingestion' at the bottom left at any time during mapping to adjust your spreadsheet and restart.
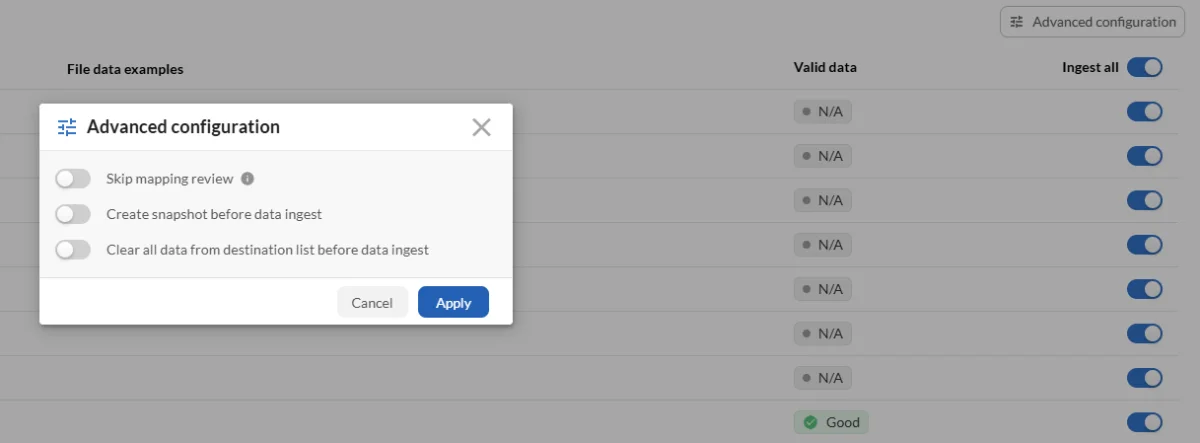
Step 7: Advanced Configuration (Optional)
Before proceeding, toggle any additional options that apply:
Skip mapping review – Automatically ingest if all mappings match.
Create snapshot before ingest – Capture a snapshot of the destination list before changes are applied.
Clear all data from destination list before ingest – Remove existing list data before ingesting new records.
Click Apply, then OK in the Ingestion details flyout.
Step 8: Start Mapping
Click Start Mapping in the bottom right
Status will show In Queue — click the refresh icon to update
When Status changes to Pending, click Actions → Map & Verify.

Step 9: Mapping Verification
Work through three verification steps in sequence:
Field Mapping — review matched, partially matched, and unmatched fields. Adjust as needed. Click Next.
Status Mapping — CORAS compares status values from your file with existing CORAS statuses. Map each value to the corresponding CORAS status. Mismatches may require an admin to add new statuses in Administrator Settings.
Priority Mapping — match values to CORAS default priorities: High, Medium, Low, No Priority. Optionally treat blanks as No Priority. Click Next.
Step 10: Review and Confirm
Review the summary of items ready for ingestion.
Confirm all mappings and click Process (bottom right).
This step is final. Ingestions cannot be undone after clicking Process. If anything looks wrong, click Reject Ingestion now — once processing begins it cannot be reversed.
Step 11: Track Ingestion Progress
Monitor status from the ingestion list:
Completed — all records ingested successfully
Completed with Warnings — ingested with non-blocking issues - review details
Completed with Errors — some records may not have ingested - review details
Ingestion details include: source file with download link, destination nodes, configuration summary, and user and timestamps.
Step 12: View Items in Map
Return to the Map view
Hover over the node used in the ingestion
Click Navigate To — the second icon from the top when hovering
Select the List view tab at the top of the page
Open the left-side panel, search for your list by name, and click it to view records on the right
Use the filter icons on the far right to refine the list, or click the pencil icon to drill into a specific record.
Your data is now in CORAS. The next step is creating a Smart List configuration on top of this list so your team can view, filter, and interact with the data. See Smart List Configuration.
Best Practices
Refresh often — use the refresh icon in the upper right throughout the ingestion workflow to stay current on status
Prep your Node column first — for multi-node ingests, define the column and verify node names match exactly before uploading
Decide field types before uploading — review the field type table above and resolve ambiguous fields in your spreadsheet before ingest. Mismatched types cause errors at the mapping stage that require restarting.
Resolve status mismatches early — fix them in Administrator Settings before ingesting rather than working around them during mapping
Use Custom keys when syncing — if this list will be updated from an external source system, use a Custom key that matches the source record's identifier from day one
Get Help
Contact your CORAS administrator or Customer Success Manager for support with ingestion configuration and troubleshooting.